OpenLiteSpeed是LiteSpeed Technologies开发的LiteSpeed Server的轻量级开源版本。它支持Apache Rewrite规则,HTTP / 2和HTTP / 3以及TLS v1.3和QUIC协议。它带有基于WebGUI的“管理”面板,使其不同于其他服务器,并且更易于管理。
在本教程中,我们将学习如何在Fedora 31以及PHP 7.4和MariaDB服务器上安装OpenLiteSpeed Server。
先决条件
- 基于Fedora 31的Web服务器。
- 具有sudo特权的非root用户帐户。
- 更新您的系统。
$ sudo dnf update - libnsl软件包。该软件包包含NIS服务的公共客户端接口。要安装它,请发出以下命令。
$ sudo dnf install libnsl -y
步骤1-配置防火墙
在开始本教程之前,我们需要配置Fedora防火墙,该防火墙通常默认情况下处于启用状态。让我们首先检查防火墙的状态。
$ sudo systemctl status firewalld
如果不起作用,请启动防火墙。
$ sudo systemctl start firewalld
接下来,我们需要为防火墙启用SSH,HTTP,HTTPS和端口7080、8088。
$ sudo firewall-cmd --permanent --add-service=ssh

$ sudo firewall-cmd --permanent --add-service=http

$ sudo firewall-cmd --permanent --add-service=https

$ sudo firewall-cmd --permanent --add-port=7080/tcp

$ sudo firewall-cmd --permanent --add-port=8088/tcp
完成后,您可以看到将要实施的豁免清单。
$ sudo firewall-cmd --permanent --list-all
当您对更改感到满意时,请重新加载防火墙以使更改生效。
$ sudo firewall-cmd --reload
启用防火墙,以便它将在每次启动时重新加载。
$ sudo systemctl enable firewalld
第2步-安装OpenLiteSpeed
运行以下命令以从网站下载OpenLiteSpeed二进制软件包。在撰写本教程时,可用的最新版本是1.6.4。从下载页面检查最新版本,并根据需要更改URL。
$ wget https://openlitespeed.org/packages/openlitespeed-1.6.4.tgz
提取档案。
$ tar -zxvf openlitespeed-1.6.4.tgz
切换到openlitespeed目录并运行安装脚本。
$ cd openlitespeed

$ sudo ./install.sh
启动Web服务器。
$ sudo /usr/local/lsws/bin/lswsctrl start
检查服务器的状态。
$ sudo /usr/local/lsws/bin/lswsctrl status
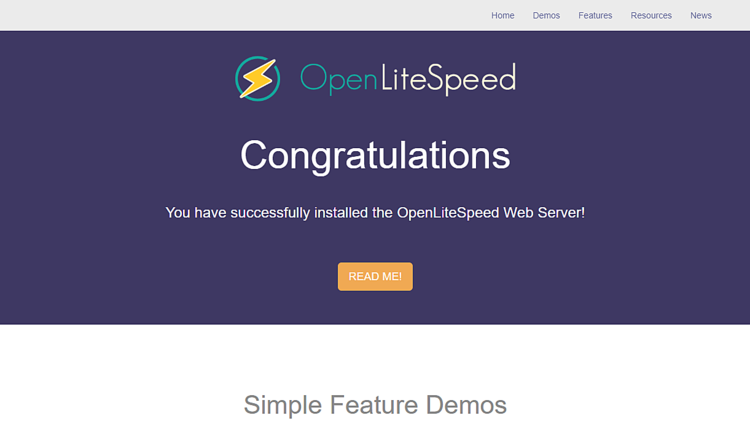
打开http:// <YOURSERVERIP>:8088以访问您的Web服务器。您应该看到以下页面。
第3步-安装PHP
OpenLiteSpeed服务器附带了预先启用的PHP 5.6。但是我们要使用PHP 7.4,因此我们将安装副本。
安装REMI存储库,这是用于安装PHP软件包的正式Fedora存储库。
$ sudo dnf -y install https://rpms.remirepo.net/fedora/remi-release-31.rpm
启用remi和remi-php74存储库,并禁用remi-modular存储库。这将启用安装PHP 7.4软件包所需的存储库。
$ sudo dnf config-manager --set-enabled remi

$ sudo dnf config-manager --set-enabled remi-php74

$ sudo dnf config-manager --set-disabled remi-modular
安装PHP 7.4以及一些其他软件包。
$ sudo dnf install php php-mysqlnd php-gd php-mcrypt php-bcmath php-litespeed
验证您的PHP安装。
$ php -v
PHP 7.4.0 (cli) (built: Nov 26 2019 20:13:36) ( NTS )
Copyright (c) The PHP Group
Zend Engine v3.4.0, Copyright (c) Zend Technologies
   with Zend OPcache v7.4.0, Copyright (c), by Zend Technologies
您可以检查已启用的PHP模块。
$ php --modules
稍后,我们将配置PHP以与OpenLiteSpeed一起使用。
步骤4-安装MariaDB
安装MariaDB服务器。
$ sudo dnf install mariadb-server
启动并启用MariaDB服务。
$ sudo systemctl start mariadb
$ sudo systemctl enable mariadb
保护您的MariaDB安装。该脚本将设置您的root密码,删除匿名用户,禁止远程root登录并删除测试表。选择一个强密码,并按照以下说明回答问题。
$ sudo mysql_secure_installation
[sudo] password for username:

NOTE: RUNNING ALL PARTS OF THIS SCRIPT IS RECOMMENDED FOR ALL MariaDB
SERVERS IN PRODUCTION USE!  PLEASE READ EACH STEP CAREFULLY!

In order to log into MariaDB to secure it, we'll need the current
password for the root user.  If you've just installed MariaDB, and
you haven't set the root password yet, the password will be blank,
so you should just press enter here.

Enter current password for root (enter for none):
OK, successfully used password, moving on...

Setting the root password ensures that nobody can log into the MariaDB
root user without the proper authorisation.

Set root password? [Y/n] y
New password:
Re-enter new password:
Password updated successfully!
Reloading privilege tables..
 ... Success!

By default, a MariaDB installation has an anonymous user, allowing anyone
to log into MariaDB without having to have a user account created for
them.  This is intended only for testing, and to make the installation
go a bit smoother.  You should remove them before moving into a
production environment.

Remove anonymous users? [Y/n] y
 ... Success!

Normally, root should only be allowed to connect from 'localhost'.  This
ensures that someone cannot guess at the root password from the network.

Disallow root login remotely? [Y/n] y
 ... Success!

By default, MariaDB comes with a database named 'test' that anyone can
access.  This is also intended only for testing, and should be removed
before moving into a production environment.

Remove test database and access to it? [Y/n] y
 - Dropping test database...
 ... Success!
 - Removing privileges on test database...
 ... Success!

Reloading the privilege tables will ensure that all changes made so far
will take effect immediately.

Reload privilege tables now? [Y/n] y
 ... Success!

Cleaning up...

All done!  If you've completed all of the above steps, your MariaDB
installation should now be secure.

Thanks for using MariaDB!
完成此操作后,您可以使用以下命令登录到MySQL Shell。
$ sudo mysql -u root -p
创建一个具有访问权限的测试数据库和用户。为您的设置替换testdb并testuser使用适当的名称。替换password为强密码。
CREATE DATABASE testdb;
CREATE USER 'testuser' IDENTIFIED BY 'password';
GRANT ALL PRIVILEGES ON testdb.* TO 'testuser';
FLUSH PRIVILEGES;
退出MySQL Shell。
exit
第5步-配置OpenLiteSpeed
配置管理面板
设置管理员面板凭据。
$ sudo /usr/local/lsws/admin/misc/admpass.sh
您可以使用此命令设置用户名和密码。如果您忘记了登录详细信息,也可以使用此命令。
要访问管理面板,请打开http:// <YOURSERVERIP>:7080。
将HTTP端口切换回80
让我们将默认HTTP端口更改为80。使用您刚创建的凭据登录到管理面板,网址为http:// <YOURSERVERIP>:7080。
以下屏幕将向您致意。
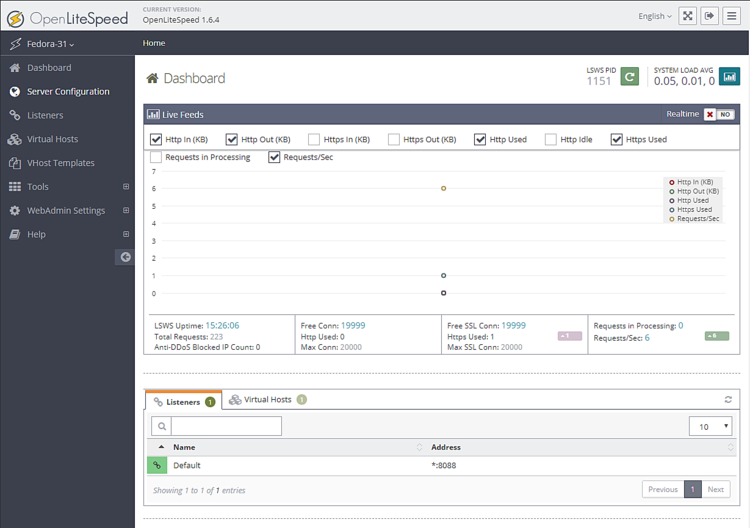
从左侧访问“访问者”部分。您将看到默认侦听器的端口为8080。

单击查看按钮以查看详细信息配置。在“ 侦听器默认设置”>“常规页面”下的下一页上,单击“ 编辑”图标,然后将端口从8088更改为80。
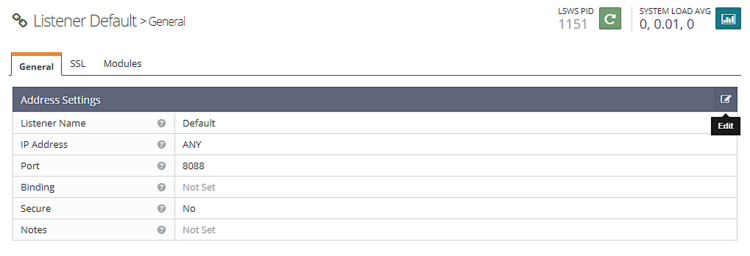
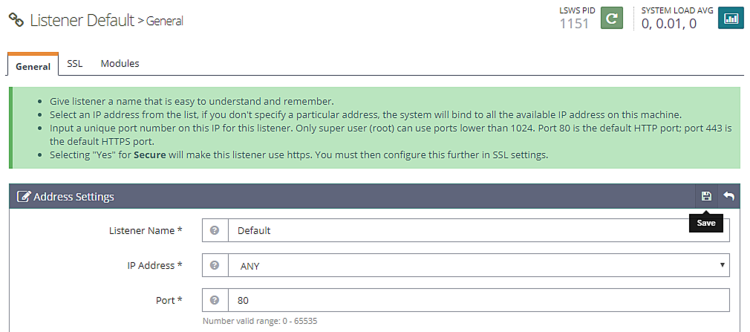
单击保存,然后通过单击正常重启按钮来重启服务器。

第6步-配置PHP
在此步骤中,我们需要将PHP 7.4的副本与服务器关联。
单击左侧的“ 服务器配置”部分,然后单击“ 外部应用程序 ”选项卡。您将看到一个现有的PHP 5.6 LiteSpeed应用程序。我们将为PHP 7.4创建自己的LiteSpeed应用。如果需要,您可以稍后在它们之间轻松切换。
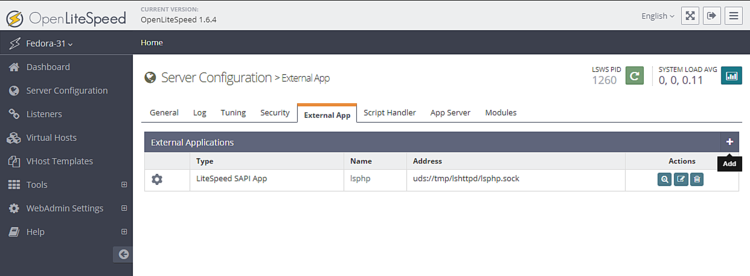
单击添加按钮创建一个新的应用程序。对于类型,选择LiteSpeed SAPI App,然后单击Next。

接下来,添加以下配置。将所有其他字段留空。
Name: lsphp74
Address: uds://tmp/lshttpd/lsphp.sock
Max Connections: 35
Environment: PHP_LSAPI_MAX_REQUESTS=500
             PHP_LSAPI_CHILDREN=35
			LSAPI_AVOID_FORK=200M
Initial Request Timeout (secs): 60
Retry Timeout : 0
Persistent Connection: Yes
Response Buffering: no
Start By Server: Yes(Through CGI Daemon)
Command: /usr/bin/lsphp
Back Log: 100
Instances: 1
Priority: 0
Memory Soft Limit (bytes): 2047M
Memory Hard Limit (bytes): 2047M
Process Soft Limit: 1400
Process Hard Limit: 1500
完成后单击“保存”。

现在,我们已经创建了自己的基于PHP 7.4的应用程序,我们需要告诉服务器开始使用它。
转到“ 脚本处理程序”选项卡,然后编辑lsphp处理程序。从下拉菜单中将Handle名称切换为lsphp74。
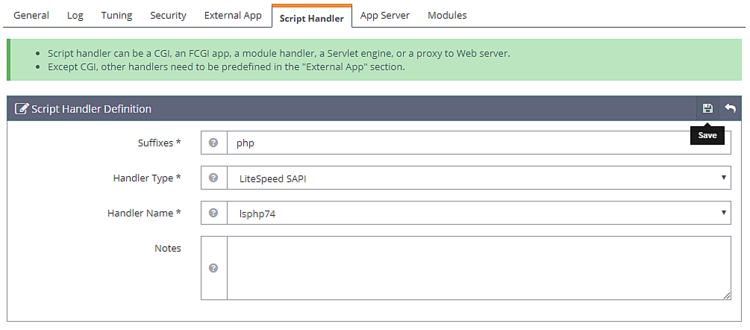
单击保存,然后通过单击正常重启按钮来重启服务器。
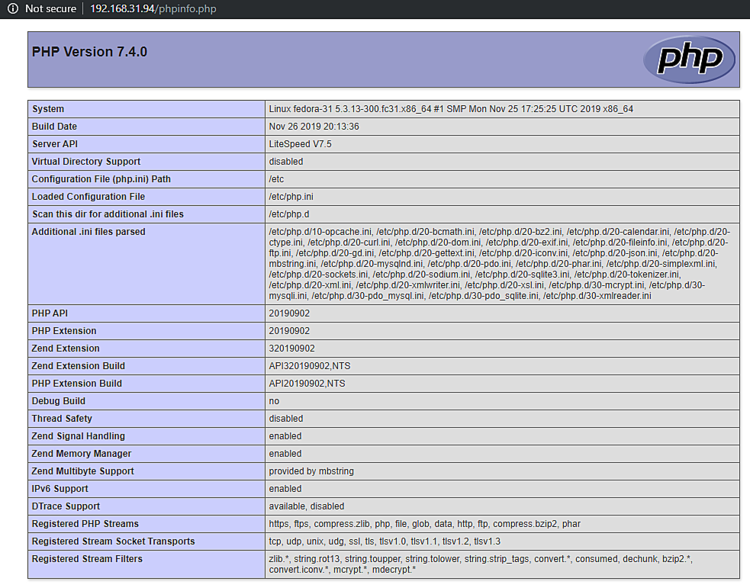
要测试您的PHP是否已正确切换,请在浏览器中访问http:// <YOURSERVERIP> /phpinfo.php。
步骤7-设定虚拟主机
首先,我们需要为虚拟主机创建目录。
$ sudo mkdir /usr/local/lsws/example.com/{html,logs} -p
该html目录将logs包含公共文件,并且该目录将包含服务器日志。
接下来,打开管理控制台并从左侧访问“ 虚拟主机”部分,然后单击“添加”按钮。

填写指定的值
Virtual Host Name: example.com
Virtual Host Root: $SERVER_ROOT/example.com/
Config File: $SERVER_ROOT/conf/vhosts/$VH_NAME/vhconf.conf
Follow Symbolic Link: Yes
Enable Scripts/ExtApps: Yes
Restrained: Yes
External App Set UID Mode: Server UID
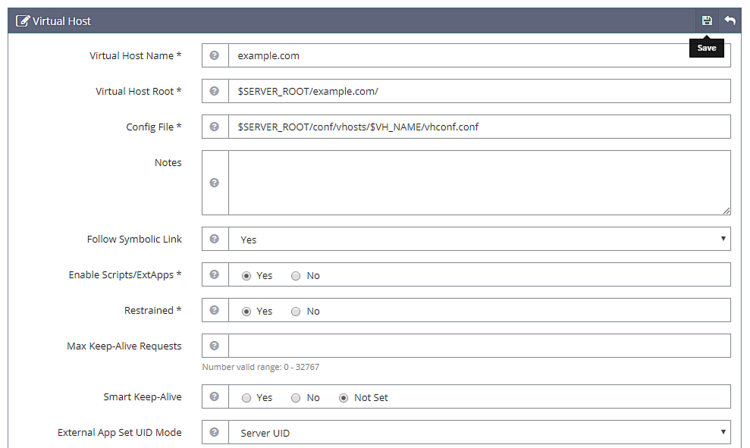
完成后单击“保存”按钮。由于配置文件目前不存在,您将收到以下错误。单击链接以创建配置文件。
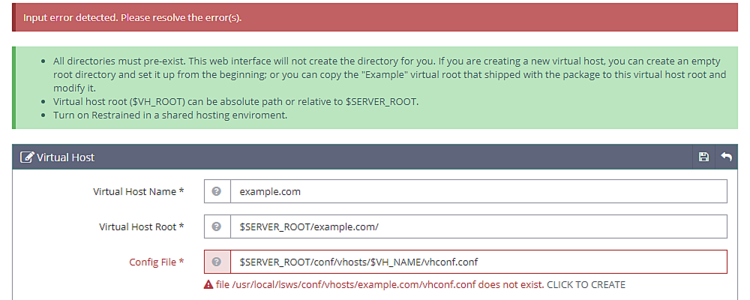
再次单击“保存”按钮以完成虚拟主机的创建。
创建虚拟主机后,转到虚拟主机->选择虚拟主机(example.com)->常规,然后按给定的配置进行修改。
Document Root: $VH_ROOT/html/
Domain Name: example.com
Enable Compression: Yes
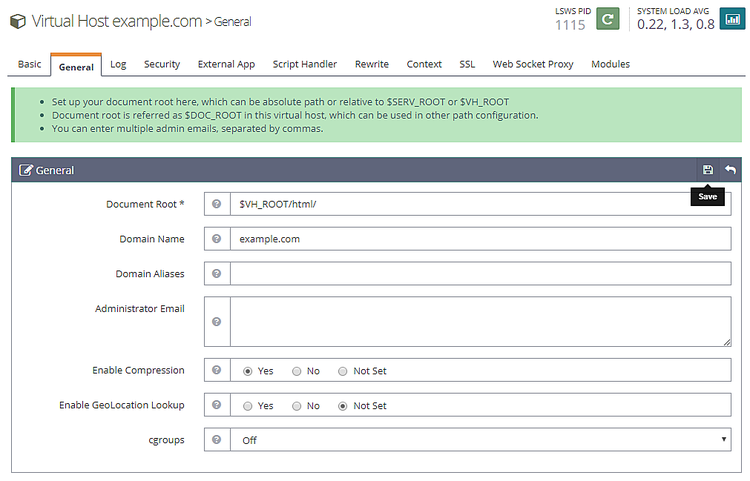
完成后单击“保存”按钮。接下来,我们需要设置索引文件。单击“常规”部分下面的“索引文件”的编辑按钮。设置以下选项。
Use Server Index Files: No
Index files: index.php, index.html, index.htm
Auto Index: No
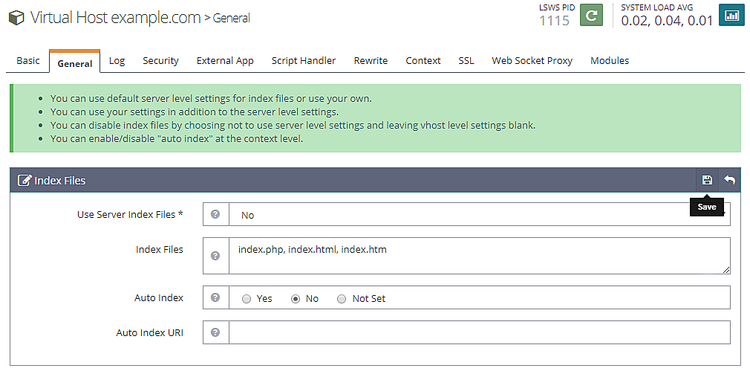
完成后单击“保存”。接下来,我们需要选择日志文件。转到“日志”部分,然后单击“针对虚拟主机日志进行编辑”,然后填写以下值。
Use Server’s Log: Yes
File Name: $VH_ROOT/logs/error.log
Log Level: ERROR
Rolling Size (bytes): 10M

如果您在生产/开发计算机上,则可以选择“日志级别”作为“ 调试”。
单击“保存”,然后打开“ 访问日志”部分。填写以下值。
Log Control: Own Log File
File Name: $VH_ROOT/logs/access.log
Piped Logger: Not Set
Log Format: Not Set
Log Headers: Not Set
Rolling Size (bytes): 10M
Keep Days: 30
Bytes log: Not Set
Compress Archive: Yes

完成后单击“保存”。接下来,我们需要在“ 安全性”部分下配置访问控制。设置以下值。
Allowed List: *
Denied List: Not set

完成后单击“保存”。接下来,我们需要设置脚本处理程序。设置以下值。
Suffixes: php
Handler Type: LiteSpeed SAPI
Handler Name: [Server Level]: lsphp74

接下来,我们需要在“重写”部分下设置“ 重写控制 ”。设置以下值。
Enable Rewrite: Yes
Auto Load from .htaccess: Yes
Log Level: Not Set

最后,我们需要设置监听器。转到“侦听器”部分,然后针对“ 默认侦听器”单击“查看”按钮。然后,在“ 虚拟主机映射”上单击“添加”按钮以添加新的映射并设置以下值。
Virtual Host: example.com
Domains: example.com

完成后单击“保存”。现在,单击“正常重启”按钮以应用上述所有更改并重启服务器。
步骤8-设定SSL
要使用“让我们加密”,我们需要安装Certbot工具。
$ sudo dnf install certbot
获取SSL证书。
$ sudo certbot certonly --webroot -w /usr/local/lsws/example.com/html/ -d example.com
按照交互式提示。
Saving debug log to /var/log/letsencrypt/letsencrypt.log
Plugins selected: Authenticator webroot, Installer None
Enter email address (used for urgent renewal and security notices) (Enter 'c' to
cancel): youremail@emaildomain.com
Starting new HTTPS connection (1): acme-v01.api.letsencrypt.org

-------------------------------------------------------------------------------
Please read the Terms of Service at
https://letsencrypt.org/documents/LE-SA-v1.2-November-15-2017.pdf. You must agree
in order to register with the ACME server at
https://acme-v02.api.letsencrypt.org/directory
-------------------------------------------------------------------------------
(A)gree/(C)ancel: A

-------------------------------------------------------------------------------
Would you be willing to share your email address with the Electronic Frontier
Foundation, a founding partner of the Let's Encrypt project and the non-profit
organization that develops Certbot? We'd like to send you email about our work
encrypting the web, EFF news, campaigns, and ways to support digital freedom.
-------------------------------------------------------------------------------
(Y)es/(N)o: N
Obtaining a new certificate
Performing the following challenges:
http-01 challenge for example.com
Using the webroot path /usr/local/lsws/example.com/html for all unmatched domains.
Waiting for verification...
Cleaning up challenges

IMPORTANT NOTES:
 - Congratulations! Your certificate and chain have been saved at:
   /etc/letsencrypt/live/example/fullchain.pem. Your key file has
   been saved at:
   /etc/letsencrypt/live/linode.nspeaks.com/privkey.pem Your cert will
   expire on 2020-03-07. To obtain a new or tweaked version of this
   certificate in the future, simply run certbot again. To
   non-interactively renew *all* of your certificates, run "certbot
   renew"
 - Your account credentials have been saved in your Certbot
   configuration directory at /etc/letsencrypt. You should make a
   secure backup of this folder now. This configuration directory will
   also contain certificates and private keys obtained by Certbot so
   making regular backups of this folder is ideal.
 - If you like Certbot, please consider supporting our work by:

   Donating to ISRG / Let's Encrypt:   https://letsencrypt.org/donate
   Donating to EFF:                    https://eff.org/donate-le
现在,打开管理控制台,然后转到侦听器>>添加新侦听器,然后添加以下值。
Listener Name: SSL
IP Address: ANY
Port: 443
Secure: Yes
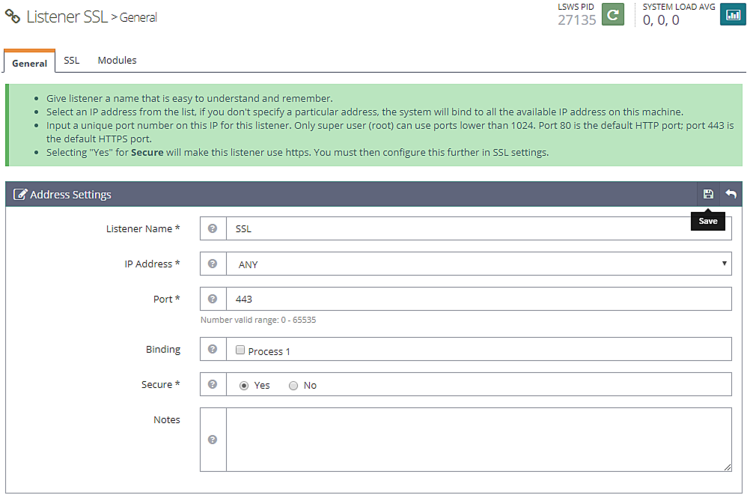
完成后单击“保存”。接下来,转到“ SSL侦听器”下的“ 虚拟主机映射”部分,单击“添加”按钮并填写以下值。
Virtual Host: example.com
Domains: example.com

完成后单击“保存”。
接下来转到侦听器>> SSL侦听器>> SSL选项卡>> SSL私钥和证书(“编辑”按钮)并填写以下值
Private Key File: /etc/letsencrypt/live/example.com/privkey.pem
Certificate File: /etc/letsencrypt/live/example.com/fullchain.pem
Chained Certificate: Yes
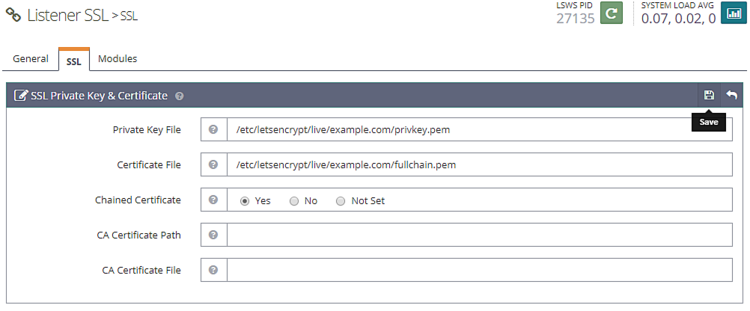
完成后单击“保存”。通过单击正常重启按钮来重启服务器。
第9步-测试站点
在html目录中创建一个测试文件。
$ sudo nano /usr/local/lsws/example.com/html/index.php
将以下代码粘贴到Nano编辑器中。
<html>
<head>
    <h2>OpenLiteSpeed Server Install Test</h2>
</head>
    <body>
    <?php echo '<p>Hello,</p>';

    // Define PHP variables for the MySQL connection.
    $servername = "localhost";
    $username = "testuser";
    $password = "password";

    // Create a MySQL connection.
    $conn = mysqli_connect($servername, $username, $password);

    // Report if the connection fails or is successful.
    if (!$conn) {
        exit('<p>Your connection has failed.<p>' .  mysqli_connect_error());
    }
    echo '<p>You have connected successfully.</p>';
    ?>
</body>
</html>
在浏览器中通过https://example.com访问您的站点,您应该看到以下页面。

这就是本教程的全部内容。如有任何疑问,请在下面的评论中提出。
原文地址:https://www.howtoforge.com/how-to-install-and-configure-openlitespeed-server-on-fedora-31-along-with-mariadb/
