WordPress是世界上免费的,开源的,使用最广泛的内容管理系统。这是一个非常强大的博客平台,可用于托管博客,产品组合网站和电子商务平台。WordPress使用Apache / Nginx作为Web服务器,使用MariaDB / MySQL作为数据库和PHP处理。WordPress提供了大量主题和插件,可用于自定义其功能。
在本教程中,我们将说明如何在CentOS 8服务器上用Nginx安装WordPress,然后使用免费的Let’s Encrypt SSL证书来保护服务器的安全。
先决条件
- 运行CentOS的服务器8。
- 在您的服务器上配置了root密码。
- 有效的域名指向您的服务器IP地址。
入门
默认情况下,在CentOS 8服务器中启用SELinux。因此,您需要先禁用它。
您可以通过编辑/ etc / selinux / config文件来做到这一点:
nano /etc/selinux/config进行以下更改:
SELINUX=disabled
保存并关闭文件。然后,重新启动服务器以应用更改。
安装LEMP服务器
开始之前,您需要在服务器上安装Nginx,MariaDB,PHP和其他必需的软件包。您可以通过运行以下命令来安装所有它们:
yum install nginx php php-cli php-curl php-zip php-mbstring php-mysqlnd php-fpm curl unzip mariadb-server -y安装完所有软件包后,启动Nginx,PHP-FPM,MariaDB服务,并使它们在系统重新引导后启动:
systemctl start nginx
 systemctl enable nginx
 systemctl start mariadb
 systemctl enable mariadb
 systemctl start php-fpm
 systemctl enable php-fpm
您还可以使用以下命令检查PHP-FPM服务的状态:
systemctl status php-fpm您应该获得以下输出:
? php-fpm.service - The PHP FastCGI Process Manager
   Loaded: loaded (/usr/lib/systemd/system/php-fpm.service; disabled; vendor preset: disabled)
   Active: active (running) since Thu 2019-10-17 05:39:11 EDT; 4min 40s ago
 Main PID: 1475 (php-fpm)
   Status: "Processes active: 0, idle: 5, Requests: 0, slow: 0, Traffic: 0req/sec"
    Tasks: 6 (limit: 5060)
   Memory: 28.5M
   CGroup: /system.slice/php-fpm.service
           ??1475 php-fpm: master process (/etc/php-fpm.conf)
           ??1478 php-fpm: pool www
           ??1479 php-fpm: pool www
           ??1480 php-fpm: pool www
           ??1481 php-fpm: pool www
           ??1482 php-fpm: pool www

Oct 17 05:39:10 centos8 systemd[1]: Starting The PHP FastCGI Process Manager...
Oct 17 05:39:11 centos8 systemd[1]: Started The PHP FastCGI Process Manager.
完成后,您可以继续下一步。
配置WordPress数据库
默认情况下,MariaDB服务器不受保护。因此,您首先需要保护它。您可以使用以下命令保护它:
mysql_secure_installation回答所有问题,如下所示:
Enter current password for root (enter for none):
Set root password? [Y/n] n
Remove anonymous users? [Y/n] Y
Disallow root login remotely? [Y/n] Y
Remove test database and access to it? [Y/n] Y
Reload privilege tables now? [Y/n] Y
一旦获得安全保护,您将获得以下输出:
Cleaning up...

All done!  If you've completed all of the above steps, your MariaDB
installation should now be secure.

Thanks for using MariaDB!
接下来,使用以下命令登录MariaDB shell:
mysql -u root -p在提示时提供您的root密码,然后使用以下命令为WordPress创建数据库和用户:
MariaDB [(none)]> CREATE DATABASE wpdb;
 MariaDB [(none)]> GRANT ALL PRIVILEGES on wpdb.* to 'wpuser'@'localhost' identified by 'password';
接下来,刷新特权并使用以下命令从MariaDB shell退出:
MariaDB [(none)]> FLUSH PRIVILEGES;
 MariaDB [(none)]> EXIT;
配置数据库后,即可继续进行下一步。
下载WordPress
您可以使用以下命令下载最新版本的WordPress:
cd /var/www/html
 wget https://wordpress.org/latest.tar.gz
下载后,使用以下命令解压缩下载的文件:
tar -xvzf latest.tar.gz接下来,将wordpress目录的所有权更改为nginx:
chown -R nginx: /var/www/html/wordpress/接下来,将目录更改为wordpress并重命名wordpress默认配置文件:
cd /var/www/html/wordpress
 cp wp-config-sample.php wp-config.php
接下来,在您喜欢的文本编辑器中编辑文件wp-config.php:
nano wp-config.php定义数据库信息,如下所示:
/** The name of the database for WordPress */
define( 'DB_NAME', 'wpdb' );

/** MySQL database username */
define( 'DB_USER', 'wpuser' );

/** MySQL database password */
define( 'DB_PASSWORD', 'password' );

/** MySQL hostname */
define( 'DB_HOST', 'localhost' );
完成后,保存并关闭文件。
为WordPress配置Nginx
接下来,您将需要创建一个Nginx虚拟主机配置文件来服务WordPress。您可以使用以下命令创建它:
nano /etc/nginx/conf.d/wordpress.conf添加以下行:
server {
    listen 80;
    server_name example.com;
    root /var/www/html/wordpress;
    index index.php;

    access_log /var/log/nginx/example.com.access.log;
    error_log /var/log/nginx/example.com.error.log;

    location = /favicon.ico {
        log_not_found off;
        access_log off;
    }

    location = /robots.txt {
        allow all;
        log_not_found off;
        access_log off;
    }

    location / {
        try_files $uri $uri/ /index.php?$args;
    }

    location ~ \.php$ {
        try_files $uri =404;
        fastcgi_pass unix:/run/php-fpm/www.sock;
        fastcgi_index   index.php;
        fastcgi_param SCRIPT_FILENAME $document_root$fastcgi_script_name;
        include fastcgi_params;
    }
    location ~* \.(js|css|png|jpg|jpeg|gif|ico|svg)$ {
        expires max;
        log_not_found off;
    }

}
保存并关闭文件。然后,使用以下命令检查nginx是否存在语法错误:
nginx -t您应该获得以下输出:
nginx: the configuration file /etc/nginx/nginx.conf syntax is ok
nginx: configuration file /etc/nginx/nginx.conf test is successful
最后,重新启动Nginx服务以应用配置更改:
systemctl restart nginx访问WordPress仪表板
已安装并配置了WordPress,现在该访问Web界面了。
打开您的Web浏览器,然后输入URL http://example.com。您将被重定向到以下页面:
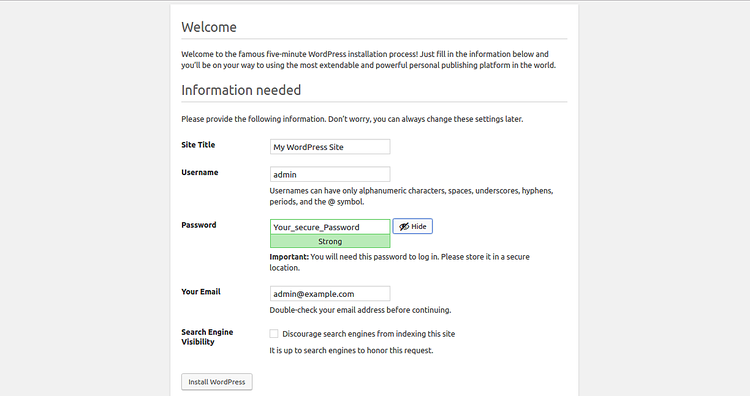
提供所有必需的信息,例如站点名称,管理员用户名,密码,管理员电子邮件,然后单击“ 安装WordPress”按钮。安装完成后。您应该看到以下页面:
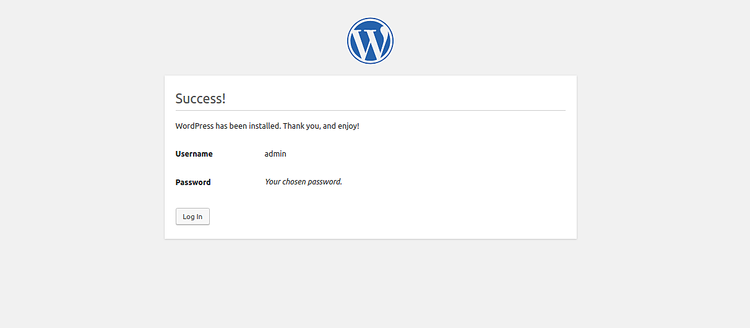
点击登录按钮。您将被重定向到WordPress登录页面:

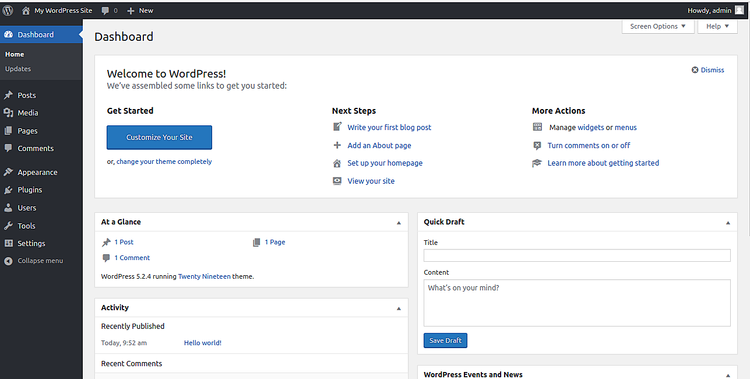
提供您的管理员用户名,密码,然后单击“ 登录”按钮。您应该在以下页面中看到WordPress仪表板:
让我们加密来保护WordPress
为了使用Let’s Encrypt免费SSL保护WordPress网站,您需要在系统中安装Certbot Let’s Encrypt客户端。默认情况下,Certbot在CentOS 8默认存储库中不可用。因此,您需要从Certbot官方网站下载它。
您可以使用以下命令下载并安装Certbot:
wget https://dl.eff.org/certbot-auto
 mv certbot-auto /usr/local/bin/certbot-auto
 chown root /usr/local/bin/certbot-auto
 chmod 0755 /usr/local/bin/certbot-auto
现在,运行以下命令以获取并安装WordPress网站的SSL证书。
certbot-auto --apache -d example.com系统将要求您提供电子邮件地址并同意服务条款。您还需要选择是否将HTTP流量重定向到HTTPS。请选择适当的选项,然后按Enter。成功完成安装后,您将获得以下输出:
IMPORTANT NOTES:
 - Congratulations! Your certificate and chain have been saved at:
   /etc/letsencrypt/live/example.com/fullchain.pem
   Your key file has been saved at:
   /etc/letsencrypt/live/example.com/privkey.pem
   Your cert will expire on 2019-08-14. To obtain a new or tweaked
   version of this certificate in the future, simply run certbot again
   with the "certonly" option. To non-interactively renew *all* of
   your certificates, run "certbot renew"
 - If you like Certbot, please consider supporting our work by:

   Donating to ISRG / Let's Encrypt:   https://letsencrypt.org/donate
   Donating to EFF:                    https://eff.org/donate-le
设置让我们加密自动续订
让我们加密证书有效期为90天。因此,建议在证书过期之前对其进行续订。您可以将Cron作业设置为自动续订证书。
为此,请使用以下命令创建crontab:
crontab -e添加以下行:
0 0,12 * * * root python -c 'import random; import time; time.sleep(random.random() * 3600)' && /usr/local/bin/certbot-auto renew
完成后,保存并关闭文件。
结论
在以上教程中,我们学习了如何在CentOS服务器上使用Nginx安装和配置WordPress。我们还学习了如何使用“免费加密SSL”来保护WordPress网站。我希望您现在可以轻松地轻松托管自己的WordPress网站。
原文:https://www.howtoforge.com/how-to-install-wordpress-with-nginx-on-centos-8/